×
- Hello
- Login or Register
- Quick Links
- Live Chat
- Track Order
- Parts Availability
- RMA
- Help Center
- Contact Us
- Shop for
- Mercedes-Benz Parts
My Garage
My Account
Cart
Genuine Mercedes-Benz C280 Brake Master Cylinder
- Select Vehicle by Model
- Select Vehicle by VIN
Select Vehicle by Model
orMake
Model
Year
Select Vehicle by VIN
For the most accurate results, select vehicle by your VIN (Vehicle Identification Number).
5 Brake Master Cylinders found

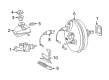
Mercedes-Benz C280 Master Cylinder
Part Number: 005-430-77-01$253.20 MSRP: $352.00You Save: $98.80 (29%)Ships in 1-2 Business Days
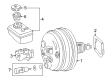
Mercedes-Benz C280 Master Cylinder
Part Number: 005-430-96-01-64$298.80 MSRP: $416.00You Save: $117.20 (29%)Ships in 1-2 Business Days
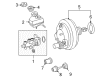
Mercedes-Benz C280 Master Cylinder
Part Number: 005-430-98-01-64$342.00 MSRP: $476.00You Save: $134.00 (29%)Ships in 1-2 Business Days
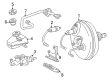
Mercedes-Benz C280 Master Cylinder
Part Number: 005-430-64-01-64$268.80 MSRP: $374.00You Save: $105.20 (29%)Ships in 1-2 Business Days
Mercedes-Benz C280 Brake Master Cylinder
Every part of the automobile matters, and their maintenance is crucial for the health of your vehicle. Moreover, a faulted Mercedes-Benz C280 Brake Master Cylinder can impact its functionality as well as lead to system-wide problems that may endanger safety. Thus, it is imperative that one repairs or replaces failing parts for better driving experiences. Why go for OEM Mercedes-Benz C280 Brake Master Cylinders? Because they are the optimal solutions, fit your vehicle perfectly, and are easy to install. Therefore, these factors help maintain the dependability and performance of your vehicle. At MBPartsGiant.com, you may find all the required genuine parts for your Mercedes-Benz C280. They are delivered from authorized Mercedes-Benz dealers directly via an uncomplicated online catalog. We guarantee promptness, reliability, and cheap sales on the Mercedes-Benz C280 Brake Master Cylinder, and we always provide you with the right part at any time. Depend on our genuine Mercedes-Benz C280 Brake Master Cylinders to keep your vehicle running smoothly.
Mercedes-Benz C280 Brake Master Cylinder Parts and Q&A
- Q: How to the remove and install of the Brake Master Cylinder on Mercedes-Benz C280?A:The master cylinder can be removed by disconnecting the cable under the negative battery terminal and depressing heavily the brake pedal a few times to wash out vacuum in the power Brake Booster. Mark the cover on the ground and then twist the fittings on the master cylinder counterclockwise by a quarter and then place some rags under the master cylinder and wipe the area around the hydraulic line fittings with brake system cleaner without touching any of the paint. Withdraw as much of the fluid as you can out of the reservoir with a syringe and un-plug electrical connector of a brake fluid level warning switch. On models with manual transmission, disconnect the brake fluid line that leads to the clutch master cylinder reservoir, stuff rags into the fittings and prepare the line ends with caps or plastic bags. To avoid flattening corners in the brake lines to the master cylinder, replace the fittings at the ends with ones loosened with a flare-nut wrench. Be sure to pull brake lines carefully away of the master-cylinder and plug the ends to prevent contamination. Unscrew the electrical connector on the side of the master cylinder that fits into the socket of the electronic stability program brake pressure device; and, installing a second sensor in the front, also, unscrew another connector attached to the master cylinder upon its loosening. You can take off the sensor on the side prepared to leak brake fluid and remove the spring nut at the end of the master cylinder and then push down the front bracket and pull them up off the frame. Unscrew the master cylinder mounting nuts and move the master cylinder off the studs, working carefully not to tip or drop the component against the pushrod in the power brake booster or risk their destruction. When the master cylinder has taken off, un-connect the electrical connector on the bottom-front ESP brake pressure sensor (where appropriate). To install, place the brake pressure sensor(s) on the new master cylinder, and bleed it by placing it in a vise and connecting bleeder tubes to the outlet ports and by pushing the piston into place with a blunt tool as you fill the reservoir with the suggested brake fluid. Make sure to push the pistons gradually into the master cylinder and expel all the air until no more bubbles exist, and then unscrew the bleed tubes and replace them with plugs in the empty holes. Install a new vacuum seal on the master cylinder, lay a cover over reservoir, attach electrical connectors and place the master cylinder on the studs on the power brake booster screwing on nuts using finger tightening. Install the brake line fittings into the master cylinder being careful not to cross-thread the fittings, and screw the mounting nuts to the correct level of tight. Fit a new spring-nut and re-attach the front bracket, so that it is rotated inward about 5 mm beyond the terminus of the master cylinder. Fill the reservoir with the appropriate fluid, bleed the brake system; do not open the line fittings immediately, but have an assistant pump the brake pedal, loosen the line fittings, one at a time, until all air is out of the fluid. Lastly, finish the installation reverse way that the process started and also examine the working of the brake system and then restore the car to normalcy.

Related Mercedes-Benz C280 Parts
 Mercedes-Benz C280 Air Suspension Spring
 Mercedes-Benz C280 Alloy Wheels
 Mercedes-Benz C280 Axle Beam
 Mercedes-Benz C280 Crankshaft Seal
 Mercedes-Benz C280 Lift Support
 Mercedes-Benz C280 Ride Height Sensor
 Mercedes-Benz C280 Seat Cushion Pad
 Mercedes-Benz C280 Thermostat
 Mercedes-Benz C280 Washer Reservoir